Kaiten + Pachca integration
How to integrate Kaiten with Pachca and get notifications from your task tracker

Webhook setup, payload format and integration examples
The Pachca × Kaiten integration brings notifications from your Kaiten space straight into a Pachca chat. You and your colleagues can respond to project tasks quickly, discuss them in threads and add reactions.
There are two ways to set up the integration:
- The simple way. Everyone gets the same notifications in one or more chats. This works if you want a bot just for yourself, or if it's enough for the bot to post all notifications to a chat with your team.
- The more advanced way. Each colleague gets notifications only about their own tasks, in direct messages.
In this post, we'll show you the first, simpler option: how to set up a Kaiten integration so the bot posts notifications about most events in a space to your team's chat.
Here's how it works:
- You create a chatbot in Pachca that receives information from a specific Kaiten space.
- Inside the bot, you set up a template and write the bot's messages. The template basically "decodes" the data coming in from Kaiten and tells the bot which events to post to the chat and with what text.
- Then you add the bot to any chat, and it posts messages there about events in that space.
Step 1. Create a bot in Pachca
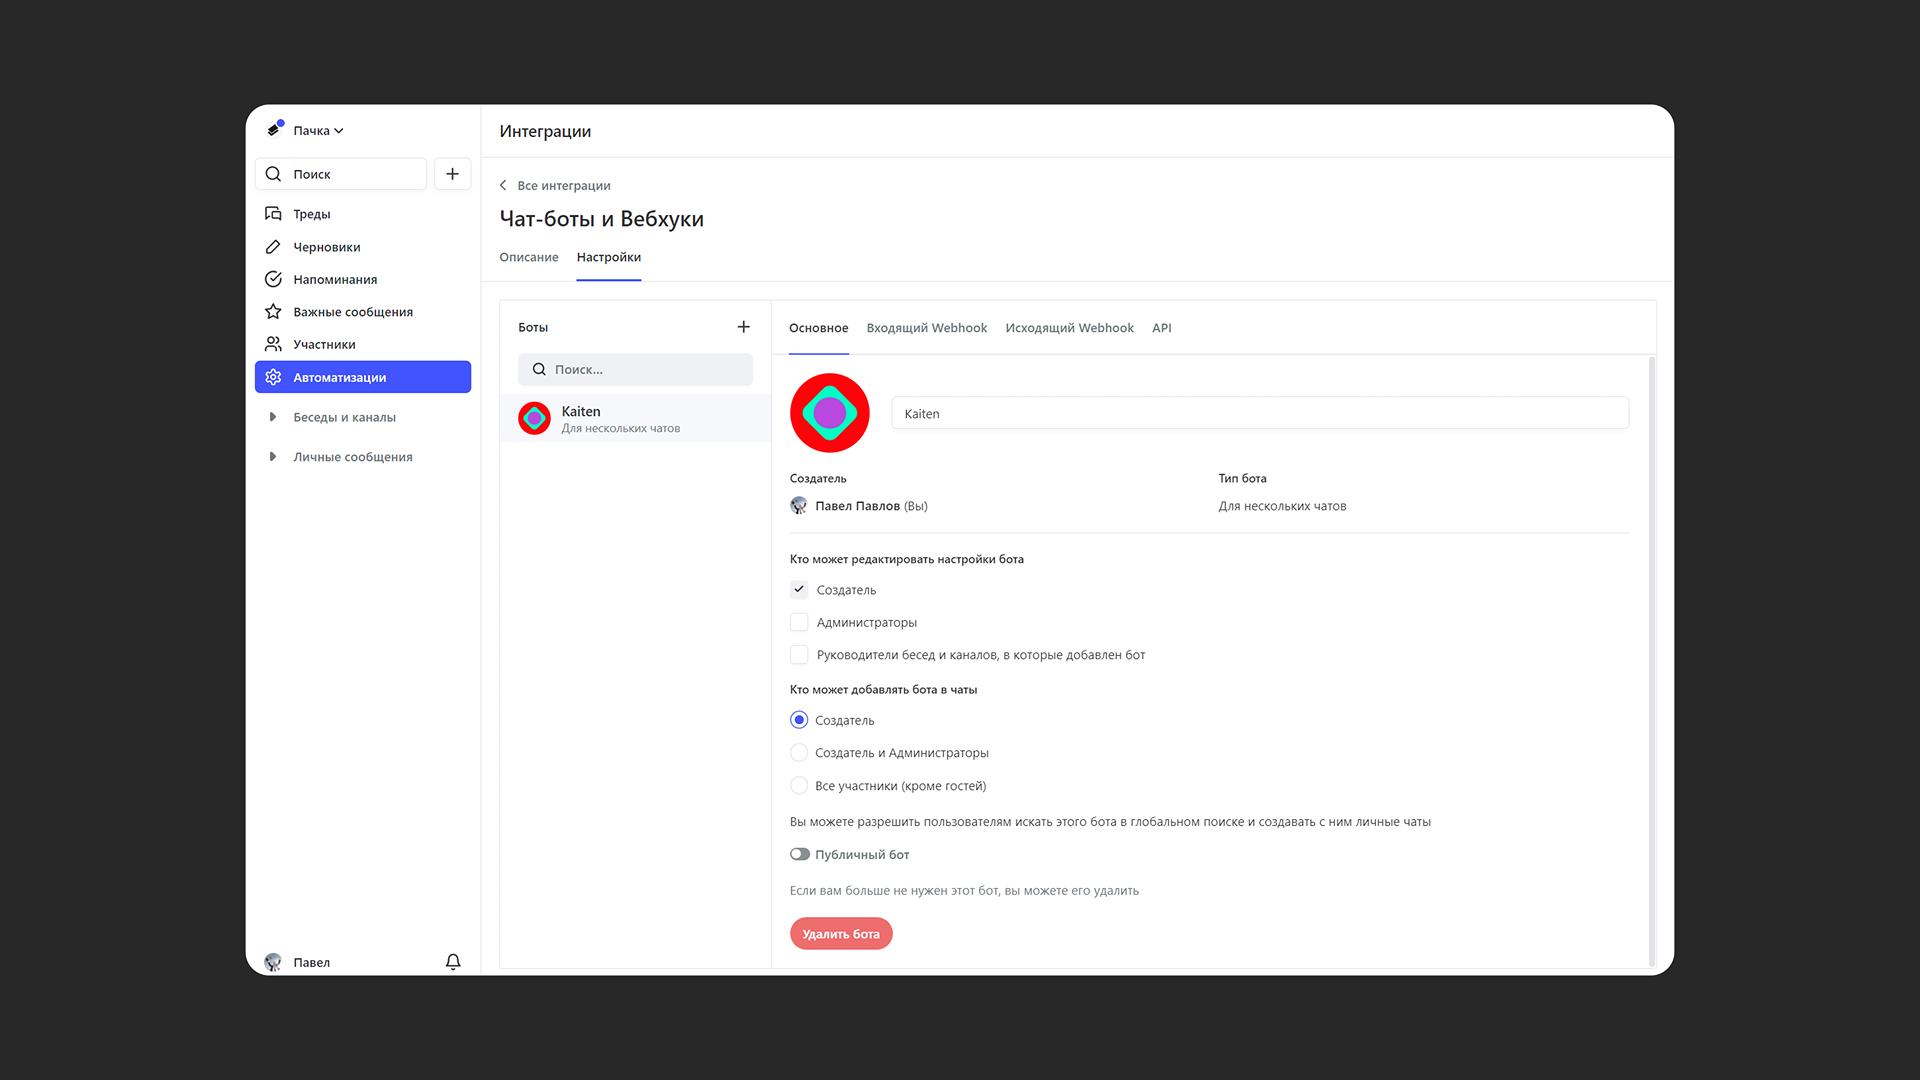
Create a new bot in Pachca:
- Go to "Automations" → "Integrations"
- Select "Chatbots and webhooks"
- Click "+"
- Name your bot and add the Kaiten logo or any other avatar
- Choose who can configure the bot. They'll see it in their Integrations section and can change its settings.
- Choose who can add your bot to chats. These users can add the bot to chats and receive its messages
- Change any other settings if needed
Copy the webhook URL (you'll need it to set up Kaiten)
- Open the "Incoming webhook" section in the bot settings window
- Find the "Webhook URL" field and copy the link in it
Add the bot to a chat
- Open the chat you want
- Go to "Chat settings" → "Add members" → "Integrations"
Step 2. Set up Kaiten
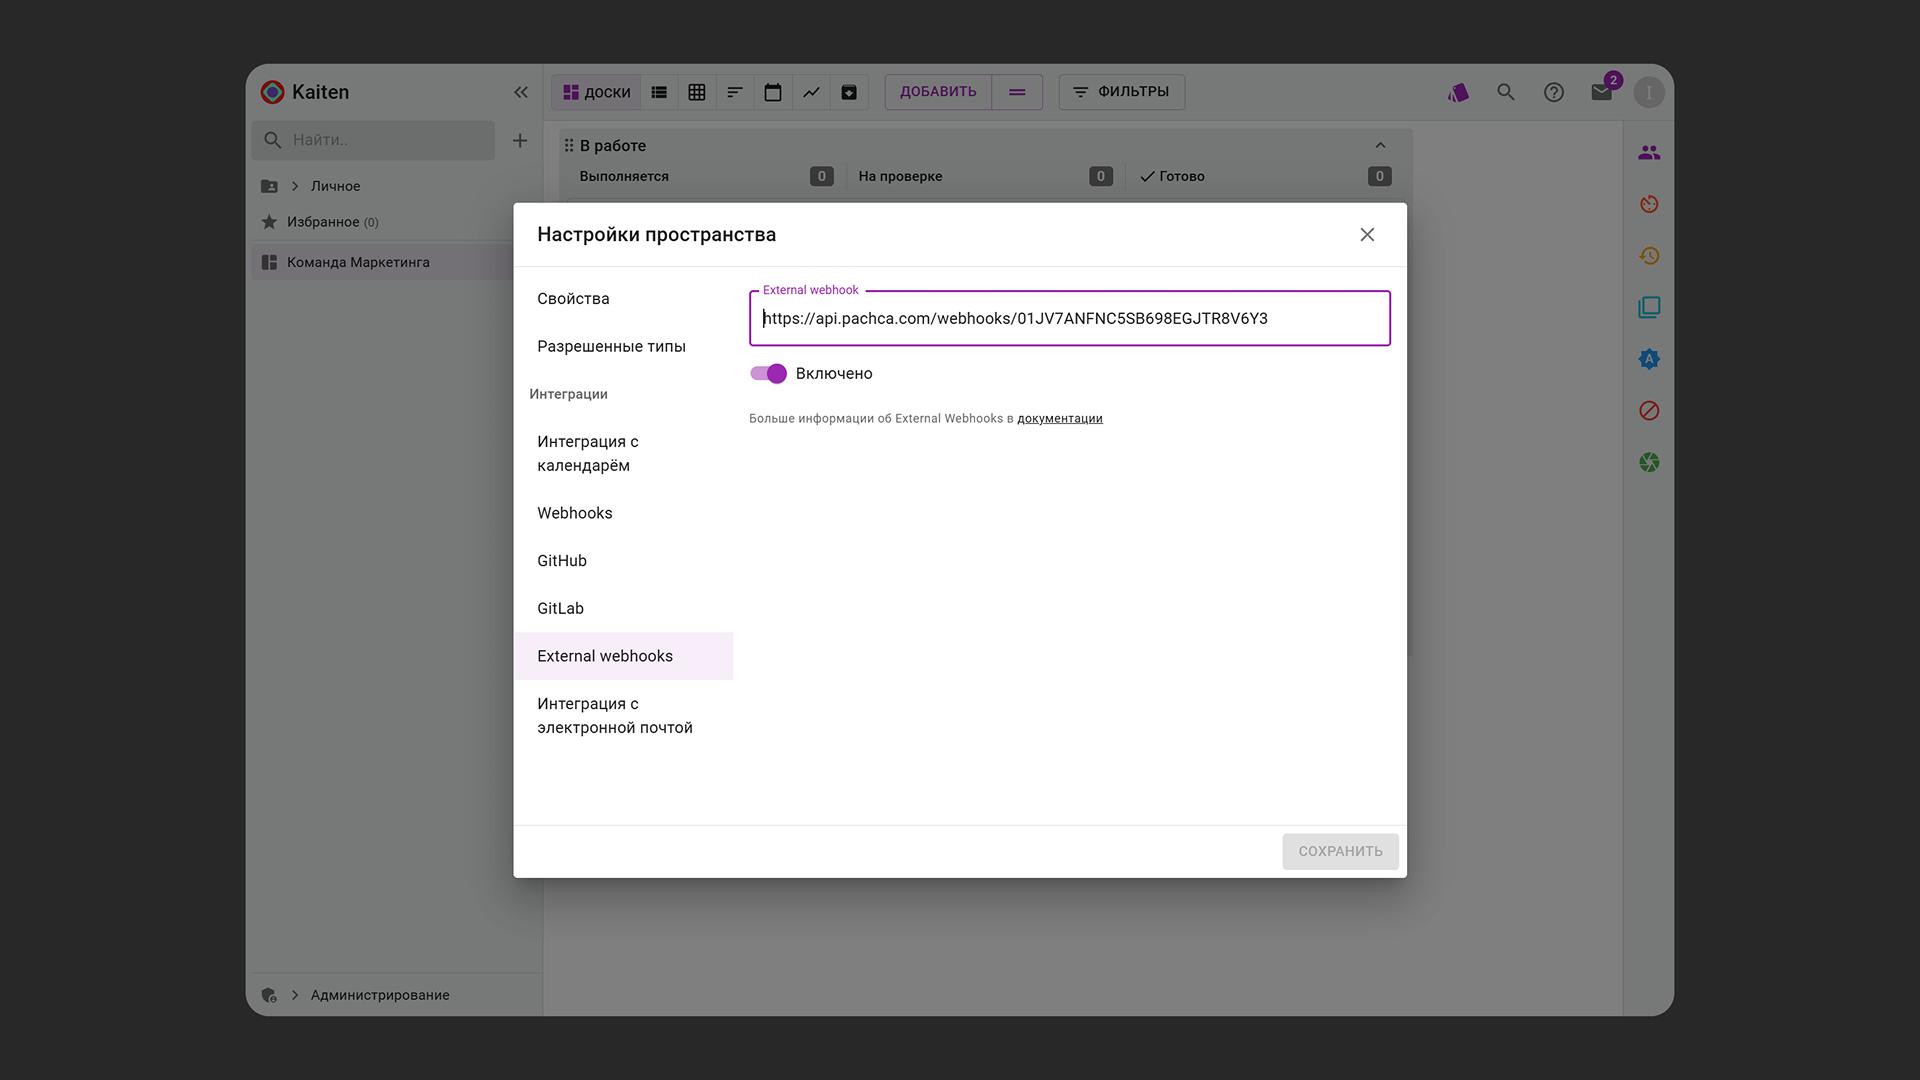
- Log in to Kaiten. You need admin rights for the space you're setting up the integration for.
- In the left sidebar, hover over the space you need and open its settings
- On the settings page, go to the "External Webhook" section
- Paste the link you copied from the bot settings in Pachca (step 1, item 2) into the field
- Turn the toggle to "On"
Copy the following details from your Kaiten (you'll need them for the final bot setup in Pachca):
- Your company name and space ID. To find them, copy a task link. They'll be in it, as shown in the image below:

- The names of the columns on your task board and their IDs. To find an ID, copy a column link and take the ID from it, as shown in the image below:

You should end up with something like this:
- Company name: "pachka"
- Space ID: "595608"
- Column names and IDs
- 4702556: "In progress"
- 4702554: "In review"
- 4702555: "Done"
- ...
Step 3. Set up the template in your Pachca bot
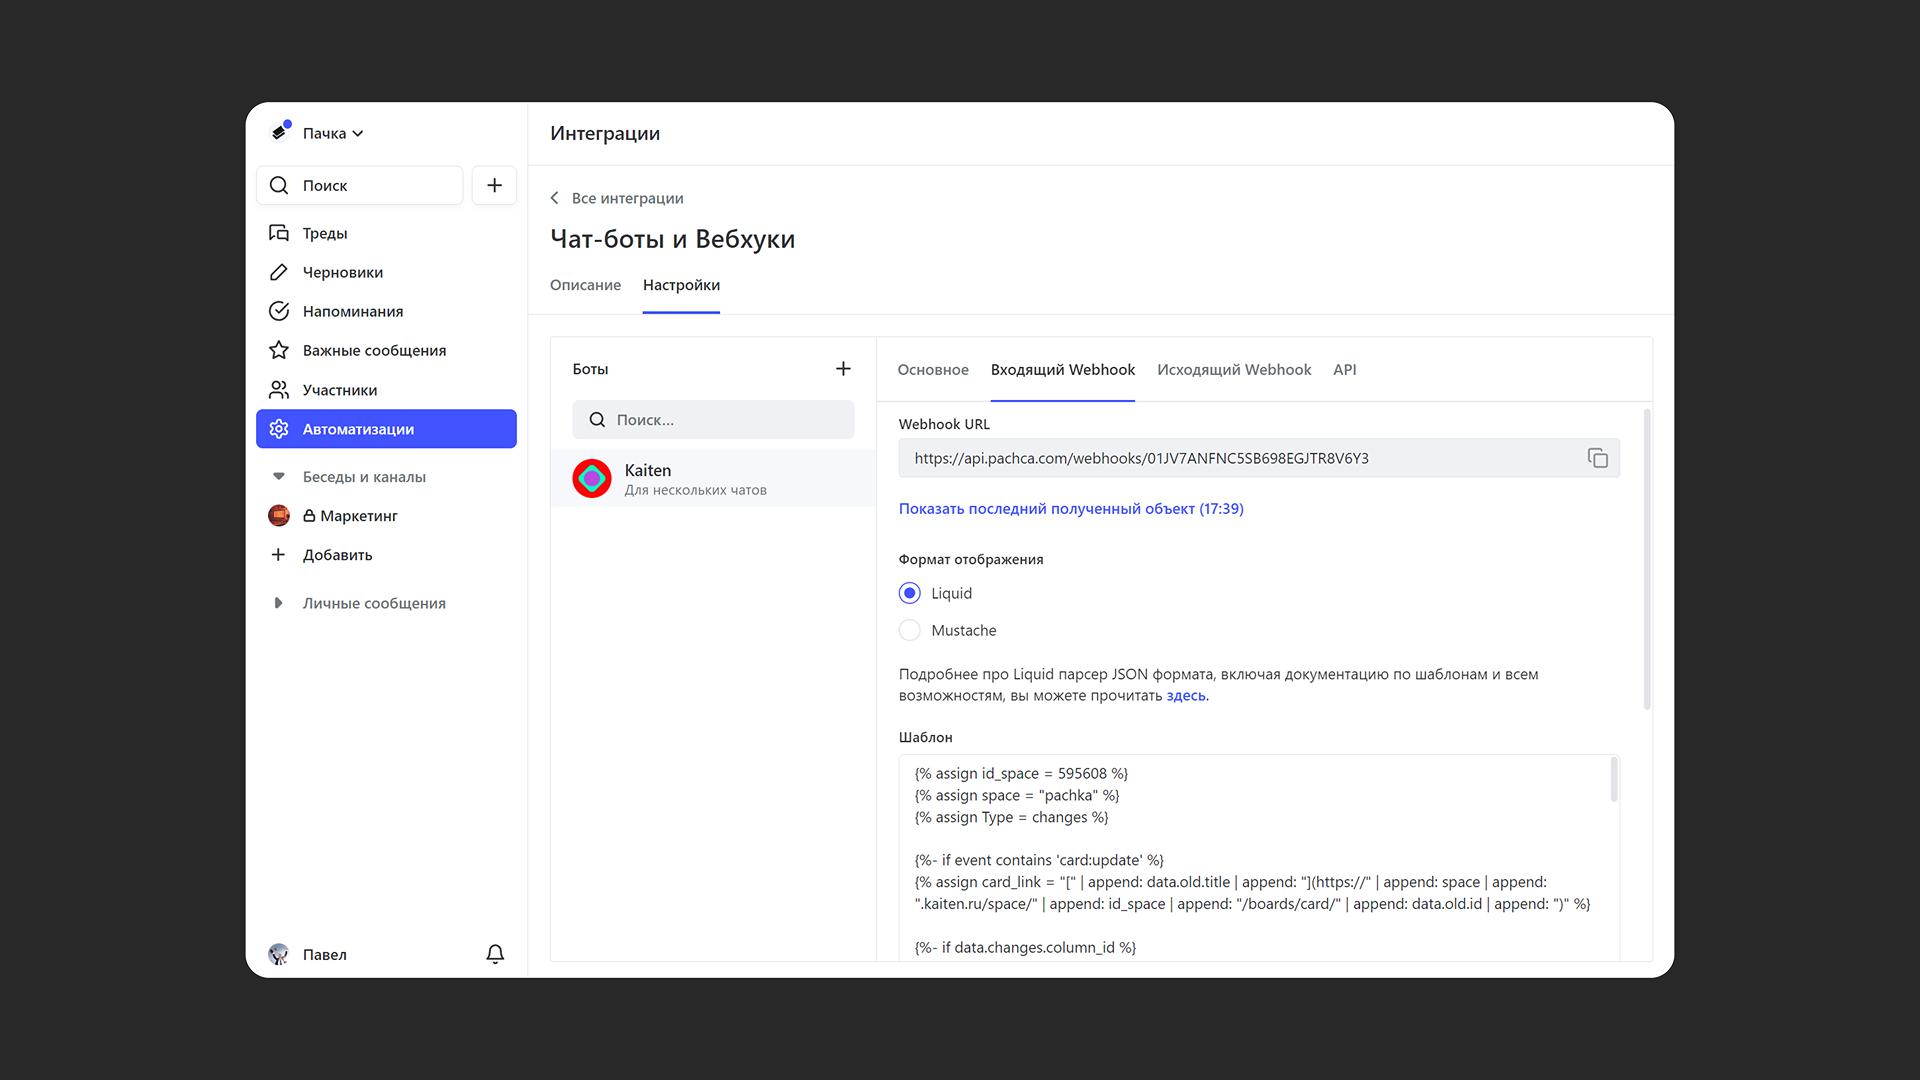
Open the settings of the bot you created in Pachca:
- Go to "Automations" → "Integrations"
- Select "Chatbots and webhooks"
- Select the bot you created at the start
- Open the "Incoming webhook" section in the bot settings window
Paste in the template that lets the bot post the right information to the chat
- In the "Incoming webhook" section, select "Display format" → "Liquid"
- Copy the code block below
- Paste the code into the "Template" field in the bot settings in Pachca
- Replace the data in the template with your own
⚠️ Pay attention to the comments shown in green on the right side of the code block. They mark the spots where you need to insert your own values, the ones you gathered while setting up Kaiten (in the previous step)
You can also remove any events you don't want to be notified about from the code
{% assign id_space = 595608 %} {% comment %}"Replace this ID_space with yours (step 2 of this guide)"{% endcomment %}
{% assign space = "pachka" %} {% comment %}"Replace this company name with yours (step 2 of this guide)"{% endcomment %}
{% assign Type = changes %}
{%- if event contains 'card:update' %}
{% assign card_link = "[" | append: data.old.title | append: "](https://" | append: space | append: ".kaiten.ru/space/" | append: id_space | append: "/boards/card/" | append: data.old.id | append: ")" %}
{%- if data.changes.column_id %}
{%- assign status_id = data.changes.column_id | default: "0" -%}
{%- case status_id -%}
{%- when 4702556 -%} {%- assign status_name = "In progress" -%} {% comment %}"Replace this column ID and column name with yours (step 2 of this guide)"{% endcomment %}
{%- when 4702554 -%} {%- assign status_name = "🟡In review" -%} {% comment %}"Replace this column ID and column name with yours (step 2 of this guide)"{% endcomment %}
{%- when 4702555 -%} {%- assign status_name = "✅Done" -%} {% comment %}"Replace this column ID and column name with yours (step 2 of this guide)"{% endcomment %}
{% comment %}"Add identical lines if you have more columns and want to include them"{% endcomment %}
{%- else -%}
{%- assign status_name = "⚠️error! This column name isn't in the bot yet. Add it in the bot settings in Pachca" -%}
{%- endcase -%}
{{ card_link }}
🏃🏼♂️**{{ data.author.full_name }}** moved this card to the `{{ status_name }}` column
{%- elsif data.changes.lane_id %}
{{ card_link }}
🏃🏼♂️**{{ data.author.full_name }}** moved this card to another lane
{%- elsif data.changes.type_id %}
{{ card_link }}
🔁**{{ data.author.full_name }}** changed this card's type
{%- elsif data.changes.description %}
{{ card_link }}
🔁**{{ data.author.full_name }}** updated this card's description: "*{{ data.changes.description }}*"
{%- elsif data.changes.description == null %}
{{ card_link }}
🔁**{{ data.author.full_name }}** removed this card's description
{%- elsif data.changes.comments_total %}
{{ card_link }}
{%- elsif data.changes.archived and data.changes.condition == 3 %}
{{ card_link }}
❌**{{ data.author.full_name }}** deleted this card
{%- elsif data.changes.archived and data.changes.condition == 2 %}
{{ card_link }}
🚫**{{ data.author.full_name }}** archived this card
{% endif %}
{%- elsif event contains 'card:add' %}
{% assign card_link = "[" | append: data.title | append: "](https://" | append: space | append: ".kaiten.ru/space/" | append: id_space | append: "/boards/card/" | append: data.id | append: ")" %}
{{ card_link }}
🆕**{{ data.owner.full_name }}** created this card
{%- elsif event contains 'comment:add' %}
✍🏼**{{ data.author.full_name }}**: {{ data.text }}
{% endif %}
Step 4. Test the integration
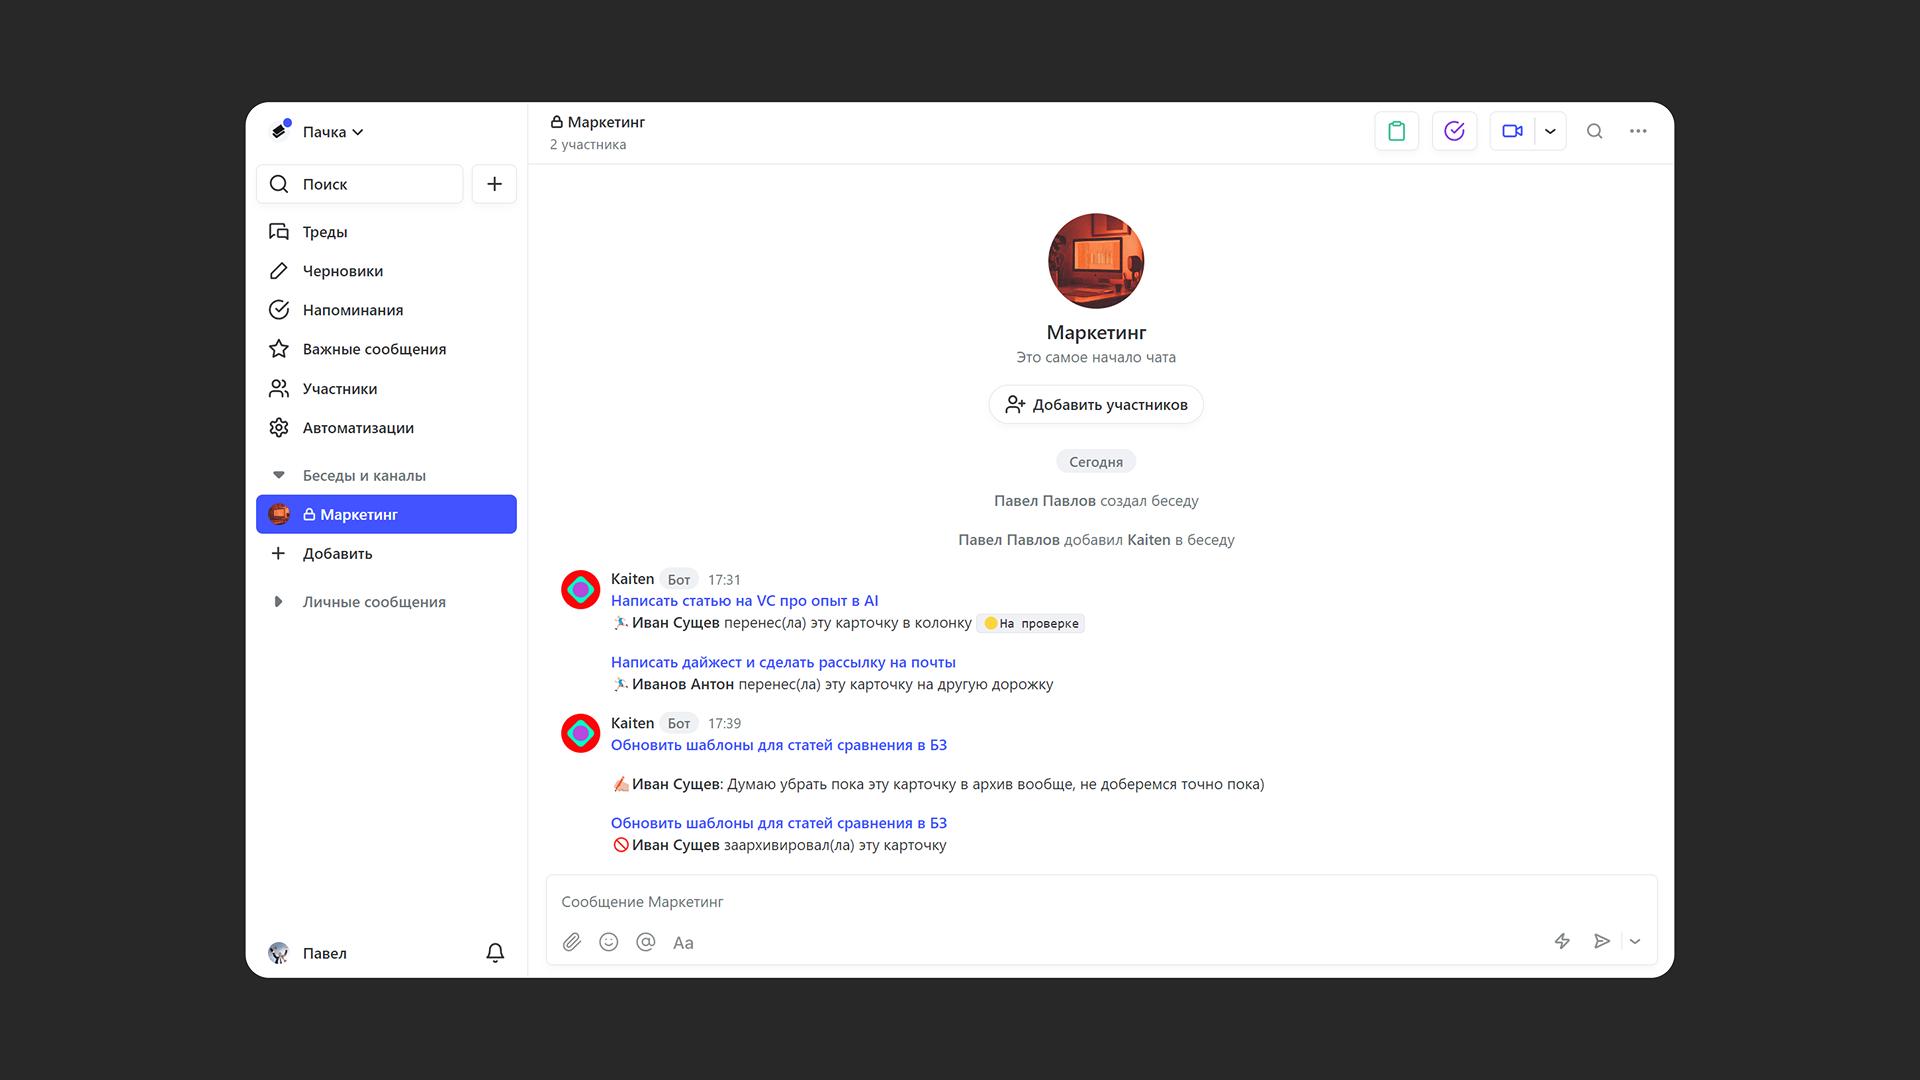
To test the trigger, do something in Kaiten. The bot should notify you in Pachca when:
- Someone creates a task
- Someone deletes a task
- Someone archives a task
- Someone moves a task to another column
- Someone moves a task to another lane
- Someone changes a task's type
- Someone changes a task's description
- Someone removes a task's description
- Someone comments on a task
If you'd like the bot to handle more events, contact our support team. We'll be happy to expand the integration, as long as Kaiten itself supports those events.
And if you want to go beyond notifications, see how the AI agent in Pachca runs whole chains of actions on tasks right from threads.